
Amdapor Keep
The Black Shroud
South Shroud (24,24)
Maps:
Requirements:
- Location of Dungeon
- Dungeon Maps
Party Size: 4
Class: Disciples of War and Magic
Time Limit: 120 minutes
Level: 50
Rewards:
Allagan Tomestones of Philosophy x 100
Allagan Tomestones of Mythology x 40
This dungeon is not required to advance in the story line, in fact it isn't even available until after you complete the story! There is a NPC (Nedrick Ironheart) outside of the Waking Sands in Vesper Bay in Western Thanalan (11,14) that will give you the quest to unlock this dungeon. You must have already completed the The Aurum Vale in order to have it available. If you don't even see that quest, you may need to get promoted more in your Grand Company.
Story
Once, the lost civilization of Amdapor thrived in the Twelveswood, her citizens wielders of powerful, yet forbidden magicks which could be used to alter the very fabric of existence. However, as is oft the case with people who fancy themselves gods, the self-assuring hubris of the Amdapori eventually became their downfall, and as quickly as they rose to power, did they disappear from the world. For generations, the relic of their once-mighty civilization has remained hidden in plain sight - cloaked by the elementals who sought only to prevent newer generations from stumbling across the ancient Amdapori magicks. That is, until the Lambs of Dalamud - a dark cult who worship the now-fallen lesser moon as a god - dispelled the elementals' glamour by means unknown, and claimed the keep as their own. Now the crazed followers use its ancient chambers to perform blood sacrifices in an effort to resurrect their evil lord.
Amdapor Keep is a popular level 50 dungeon that players run to grind tomestones for gear, because of this - if you are new... you may want to be prepared for a speed run and impatient players. If you are a tank or healer it would be wise to mention that this is your first time at the beginning, just so the others are aware and can share helpful tips.
The dungeon is fun and I like it better than grinding Wanderer's Palace, however, it is a bit more challenging. The dungeon is definitely a gear check, especially for DPS on the 2nd boss fight which essentially has a time limit to kill or everyone wipes, so be sure to check your gear before going in there. You don't have to be in full Darklight gear by any means, but just have mostly level 50 gear and melded materia won't hurt.
If you can't group up with some friends or members in your FC, cross your fingers that you get some well geared party members from the Duty Finder. You will have a Light Party of 4 people, so there will be 1 tanks, 1 healers, and 2 dps. The waiting time can be a while, but not nearly as long as the previous instances, since a lot of level 50 players run this dungeon to get Tomestones.
Before September 2013, players were able to skip the majority of the trash and do real speed runs, however, that has since been fixed and trash now has to be handled. There are some mobs that do not have to be pulled and previous obvious to spot. Also note that the Sucubus monsters can be provoked without aggroing the other mobs, so if you them, pull them first then get the rest of the mob.
![[IMG]](http://ffxivaddicts.com/images/dungeons/amdapor-keep-trash-9t.png)
Psycheflayer
Taxonomy: Transcendent/Voidsent/Soul Flayer
HP: 55,000
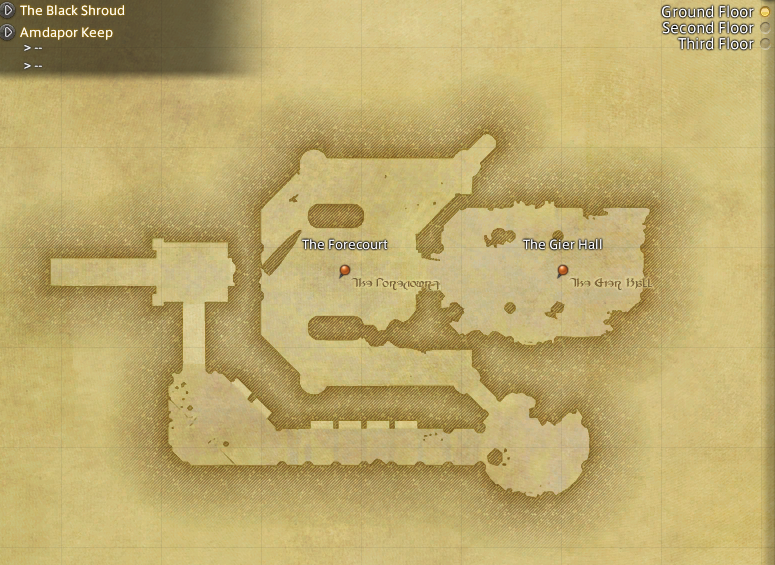
Location: Amdapor Keep - Ground Floor - The Gier Hall (10,11)
Rewards: Allagan Tomestone of Philosophy x 20
The first encounter in the keep is the Psycheflayer. He will not be present at the beginning of the fight; instead there is a Lunatic Priest you must deal with. The Priest is easy and will only cast a circular AoE called 'Void Fire II' that you should stay out of. At around 50%, he will summon the actual boss, Psycheflayer. The tank should immediately provoke/taunt the Pscyheflayer while the others burn down the Priest. Once the Priest is down everyone should focus on the Psycheflayer. The tank should position the boss somewhere in the far right of the room near the lantern.
The flayer will summon adds eventually called 'Stone Marionette' and 'Marble Marionette' which all DPS should switch to and burn down. The Tank should try to gain enmity on the adds, as well. The Stone Marionettes will cast a frontal column AoE (Rockslide) that should be avoided. Players should watch for and try to interupt the Marble Marionette's 'Obliterate' spell.
When the flayer is about at 50% he will summon a big add called "Megalith Marionette" which will slowly walk around and cast a spell called, "Plaincracker", which is a huge AoE circle. If the tank has the Psycheflayer positioned on the far right side like he is supposed to, this large AoE is easy to avoid. If for some reason he is not, you can avoid it by hiding behind one of the columns. DPS should ignore the Megalith Marionette and just focus on burning the boss.
Roles:
- Tank - Taunt Priest, DPS to 50%, immediately taunt Psycheflayer when it appears and move to the far right of room by lantern. Try to interrupt 'Void Fire III' and avoid 'Void Fire II' which will have ground indicator.
- Healer - Heal party. Remove disease debuff if possible. Don't use Regen before flayer is summoned to prevent gaining enmity.
- DPS - DPS Priest until he is dead then switch to the Pscyheflayer. Stay out of all red indicators (Void Fire II is a large AoE circle). Switch to adds when they are summoned and stay out of their frontal cones. Use DPS cooldowns on adds.
Abilities:
Psycheflayer's Abilities:
- Water - Spell that deals light damage to a player
- Canker - Inflicts Disease debuff on random player
- Void Thunder III - Spell that deals heavy damage to a player
- Mind Melt - Instant that deals a medium amount of damage to all players close to Pscyheflayer
Lunatic Priest's Abilities:
- Thunder - A spell that deals light damage to a player
- Void Fire II - A spell which deals heavy damage to all targets (has ground indicator)
- Void Fire III - A spell which deals medium damage in an area around a random target
- Void Call - Summons Psycheflayer
Stone Marionette's Abilities:
Rockslide - A frontal column that deals heavy damage to a player
Marble Marionette's Abilties:
Obliterate - A spell which deals medium damage to all nearby players
Megalith Marionette's Abilities:
Plaincracker - A large AoE circle around the Megalith Marionette that deals very heavy damage
Demon Wall
Taxonomy: Bloodless/Object/Demon Wall
HP: 52,000
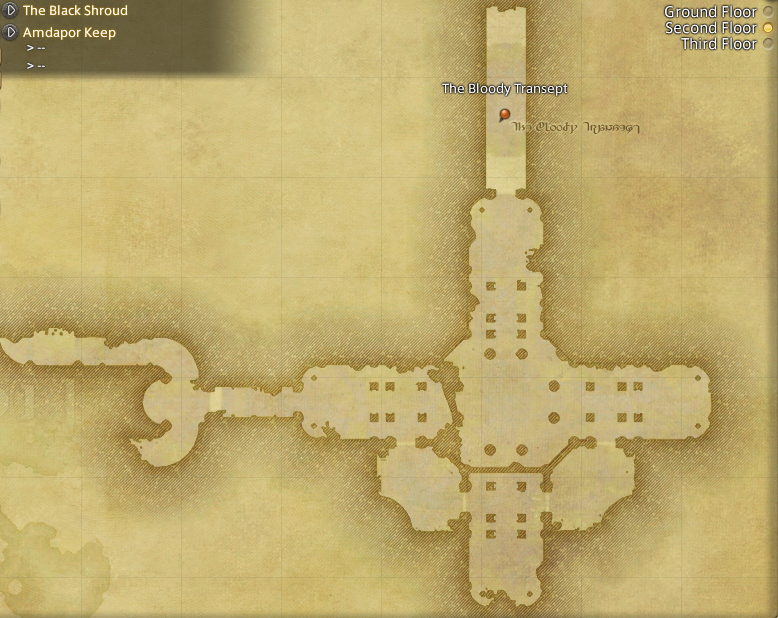
Location: Amdapor Keep - Second Floor - The Bloody Transept (12,11)
Rewards: Allagan Tomestone of Philosophy x 30
The second encounter in Amdapor Keep will probably prove to be the toughest. It is the first real DPS check in the game because if you don't have enough, the entire party will wipe! You will begin the fight with the wall on the other end of the hallway and he will slowly move forward until he crushes the party. If you are mindful of where you stand and have good DPS, this fight really isn't that hard.
The main mechanic of the fight is to avoid the black stripes the wall spawns. The Wall will first cast a stripe right down the center lane, called Liquefy (Middle). Shortly afterwards, he will cast two black stripes at each side of the hallway, called Liquefy (Sides). This means you want to remain on the side then move in. He will repeat this process twice and then cast 'Repel', which will do a knock back to everyone in the party. it is important to be facing the wall and be in the center lane before he finishes casting Repel to avoid falling off, which will result in a KO.
After 2 Repels, The Demon Wall will spawn bee adds called 'Bloodlapper'. These bees have very powerful AoE attacks that should be dodged or avoided as they will paralyze you. Players can interupt their spell 'Thunderstorm' and should kill the bees as soon as possible... I've been in some runs that the DPS is so good that the bees are hardly even out before the Wall is dead. The Demon Wall will also cast a Dark Puddle next to him after the 2nd repel greatly reducing the amount of room to move, so be careful!
So to reiterate, the pattern is:
(Liquefy (Middle) => Liquefy (Sides) => Liquefy (Middle) => Liquefy (Sides) -> Repel) x 2 => Adds
Roles:
- Tank - Focus only on the boss and avoiding the black stripes on the ground. Help interrupt Thunderstorm if possible.
- Healer - Feel free to spam heal as this is a short fight.
- DPS - Focus on not standing in the black stripes. Kill bees if they spawn and boss has more than 20% left. Interrupt the spells the bees (Thunderstorm) cast.
Abilities:
- Murder Hole - An instant ranged ability that deals a small amount of damage to a random player
- Repel - Knocks all players back and deals medium amount of damage.
- Liquefy (Middle) - is an ability that spawns a long black column in the middle of the boss room. It will do a large amount of damage and inflict the debuff Heavy to all players hit.
- Liquefy (Sides) - is an ability that spawns two long black columns at the sides of the boss room. It will do a large amount of damage and inflict the debuff Slow to all players hit.
- Thunderstorm - Ability used by the adds Bloodlapper that is a circular AoE that inflicts Paralysis to all targets within.
![[IMG]](http://ffxivaddicts.com/images/dungeons/amdapor-keep-demon-wall-2t.png)
Anantaboga
Taxonomy: Bloodborn/Scalekin/Dragon
HP: 81,500
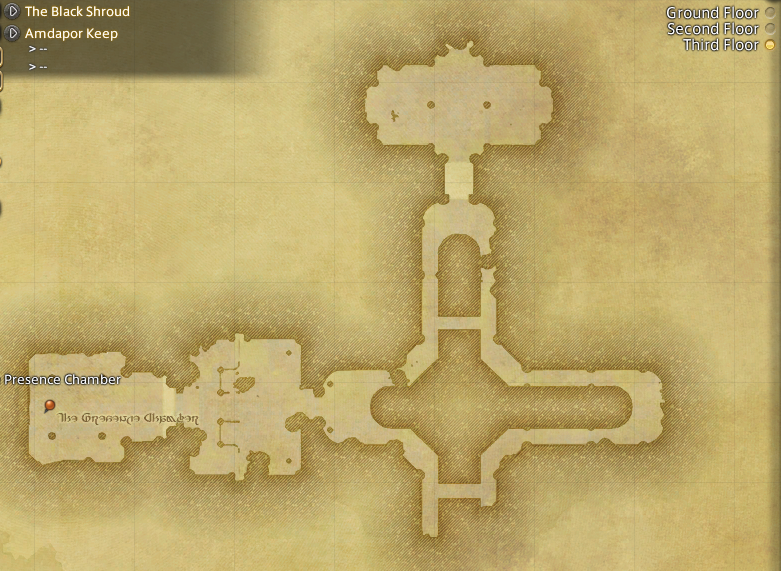
Location: Amdapor Keep - Third Floor - The Presence Chamber (11,11)
Rewards: Allagan Tomestone of Philosophy x 50, Allagan Tomestones of Mythology x 40
Anandaboga is the last boss in the keep and is pretty easy compared to your last encounter with the Demon Wall if you position him correctly! The tank should immediately pull the boss to the upper right corner of the room. All DPS should stay on the side of the boss to avoid both his frontal and backward AoE cones (they do have red warnings).
Throughout the fight the boss will cast 'Imminent Catastrophe' which will spawn little red orbs in the center of the room. Players should stay out of their line of sight by hiding behind a statue. The statues will eventually become alive and will cast '' which is a circular AoE attack. The statues do become animated in a set order, being: Top Left, Bottom Left, Bottom Right and then Top Right.
Towards the end of the fight Anantaboga will begin casting 'Plague Dance' on random targets - which looks like a pinkish beam that is connected to a non-tank player. The player that gets the debuff should move away from everyone until the next 'Imminent Catastrophe' is cast. The orb will then drop where the player last was and cause damage to anyone close to it.
Roles:
- Tank - Face the boss away from party and move to the very top-right corner of the room.
- Healer - Remove disease if possible.
- DPS - Stay on the side of the boss to avoid front and back AoE cones. Hide behind statues to avoid orb damage. Avoid statue adds circular AoE and DPS them down quickly.
Abilities:
- Look - Instant attack that deals small damage (usually always on tank)
- Tail Drive - A rear cone that deals heavy damaage and inflicts 'Concussion'. Anantaboga will only cast this if someone is detected behind him.
- Rotten Breath - A frontal AoE that deals heavy damage and inflicts 'Disease' to all players hit.
- Imminent Catastrophe - A red orb that spawns in the middle of the room. It deals heavy damage to all players in the line of sight.
- Plague Dance - A pinkish beam that targets a random player. after a few seconds, a small red orb appears at the location and deals damage to all players nearby.
- Terror Eye - An ability casted by the statue adds 'Dark Helot' that places a circular AoE under a random player, which causes heavy damage to all players caught within.
-
 Have a guide, tips, boss strategy? Have some cool FFXIV fanart you want to showcase? Submit your resource and we'll get it posted. Depending on the complexity, length and validity of the resource, you will also earn Gil. Gil can be used to cash out for real money or later purchase items from the store! Learn more.
Amdapor Keep Guide and Strategy
General tips and strategy for Amdapor Keep dungeon in FFXIV
![[IMG]](http://ffxivaddicts.com/images/dungeons/amdapor-keep-psycheflayer-3t.png)
![[IMG]](http://ffxivaddicts.com/images/dungeons/amdapor-keep-anantaboga-4t.png)


