
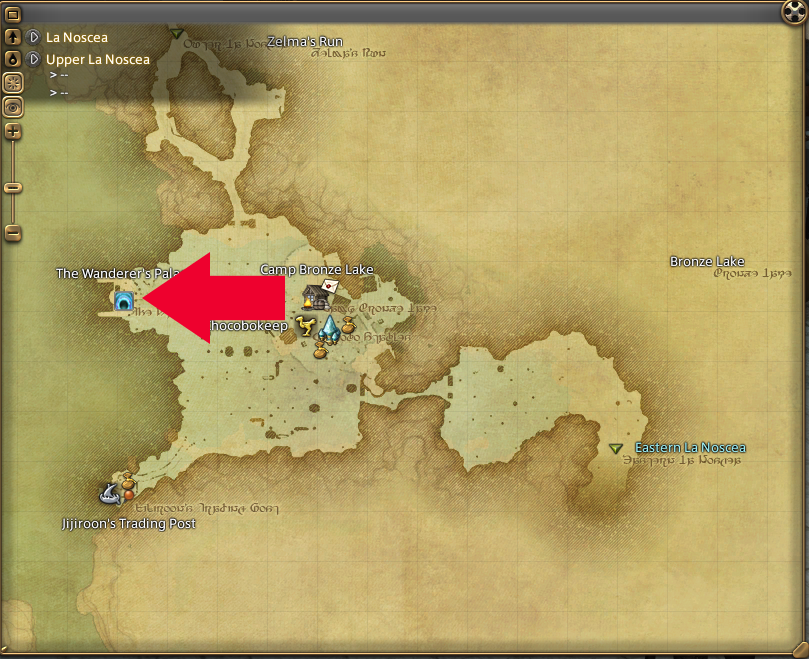
The Wanderer's Palace
La Noscea
Upper La Noscea (26,22)
Maps
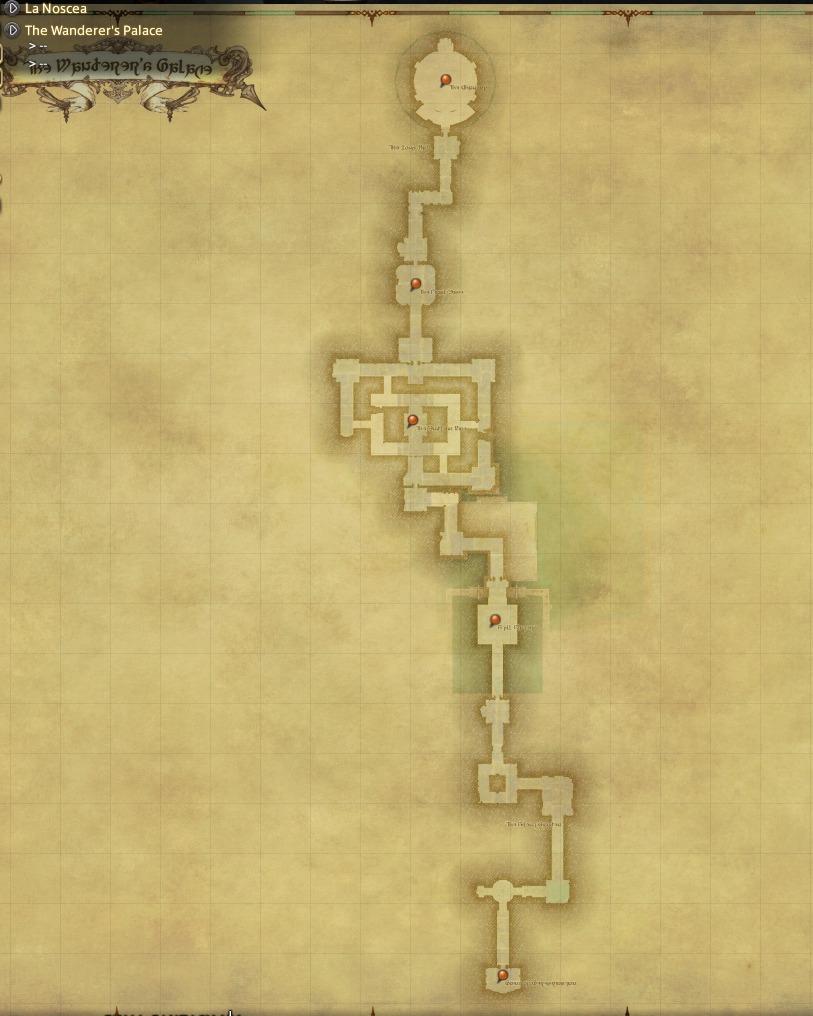
Location of Dungeon
Dungeon Maps
Requirements
Party Size: 4
Class: Disciples of War and Magic
Time Limit: 120 minutes
Level: 50
Rewards
Allagan Tomestones of Philosophy x 100
Allagan Tomestones of Mythology x 30
Overview
This dungeon is not required to advance in the story line, in fact it isn't even available until after you complete the story! There is a NPC (Allene) oustside of the Waking Sands in Vesper Bay in Western Thanalan (11,14) that will give you the quest "Trauma Queen" to unlock this dungeon. If you don't even see that quest, you may need to get promoted more in your Grand Company.
The Wanderer's Palace is a popular level 50 dungeon that players run to grind tomestones for gear, because of this - if you are new... you may want to be prepared for a speed run and impatient players. If you are a tank or healer it would be wise to mention that this is your first time at the beginning, just so the others are aware and can share helpful tips.
If you can't group up with some friends or members in your FC, cross your fingers that you get some well geared party members from the Duty Finder. You will have a Light Party of 4 people, so there will be 1 tanks, 1 healers, and 2 dps. The waiting time can be a while, but not nearly as long as the previous instances, since a lot of level 50 players run this dungeon to get Tomestones.
This is probably easier to run compared to Amdapor Keep, however, it still can be a little challenging. This dungeon also contains coffers that may drop materials needed to craft your Relic Quest line weapon. Keep in mind that after the 1st boss you will need to deactivate 'Nymian Devices' to open the lock doors - they will be marked on your map.
At the beginning of the dungeon you will be followed by a Tonberry Stalker, so be on the look out form him! The tank should quickly pull trash to stay ahead of the Stalker, or at least pull trash to the corner of the rooms to stay out of the Stalker's way. IF the Stalker gets a hold of anyone, it will deal a large amount of damage, but not necessarily KO anyone. After the 2nd boss, Giant Bavarois, pull the group of Tonberrys near the final coffer down the steps to avoid triggering a Tonberry Stalker.
There are also a few sections where a group of beetles will spawn. These are just past the first coffer, the 2nd coffer, and near the far west coffer just before the 2nd boss. These beetles can easily be AoE'ed down.
Story
Decades of kobold mining deep beneath O'Ghomoro gradually weakened upper La Noscea to the point that when the Calamity struck, the land surrounding Bronze Lake collapsed, draining its waters and revealing a palace of unparalleled beauty. Thought to have been built by the Nymian civilization which thrived in the area some fifteen centuries ago, the palace appears to have been dedicated to their patron deity, Oshon, the Wanderer. In search of the bounty she may hold, treasure hunters have already begun to delve into this forsaken place... but will treasure be the only thing they find?
Keeper of Halidom
Taxonomy: Bloodless/Seedkin/Goobbue
HP: 48,500
Location: The Wanderer's Palace - Still Waters (13,13)
Rewards: Allagan Tomestone of Philosophy x 20
The first encounter in the palace is with the Keeper of Halidom, which those that have played Final Fantasy XI may already be familiar with. This fight really isn't that difficult. The Tank should keep teh boss in the middle and faced away from the group so they don't get 'Beatdown' or infected by 'Modly Sneeze'. All DPS should spread out around the boss so essently only one person has to move to avoid 'Inhale'. If someone fails to move and gets sucked in be sure to move out immediatly to avoid the 'Goobbue's Grief', which will poison all nearby targets.
The Keeper will also randomly target a player and cast 'Moldy Phlegm' (has a ground indicator) which will cause a large amount of damage and inflicts 'Reduced Immunity', which should immediately be removed by a healer.
Roles:
- Tank - Taunt the Keeper and keep him in the center of the room faced away from the group
- Healer - Heal party. Remove 'Reduced Immunity' debuff from Tank after each 'Moldy Sneeze'. Remove 'Reduced Immunity' debuff on DPS if they can't avoid 'Moldy Phlegm'
- DPS - Stay spread out to avoid 'Inhale'. Watch for the circular ground AoE 'Moldy Phlegm'
Abilities:
- Beatdown - Instant frontal that deals medium amount of damage
- Inhale - Large cone that will suck target towards the Keeper
- Moldy Sneeze - Instal frontal that deals large amount of damage and inflicts 'Reduced Immunity'
- Goobbue's Grief - A cloud of pollen that deals a large damage and inflicts Poison to any targets near Keeper of Halidom. This is usually casted immediately after 'Inhale'
- Moldy Phlegm - A circular AoE on a random target that deals a large amount of damage and inflicts 'Reduced Immunity'
![[IMG]](http://ffxivaddicts.com/images/dungeons/the-wanderers-palace-keeper-1t.png)
Giant Bavarois
Taxonomy: Transcendent/Voidsent/Flan
HP: 48,500
Location: The Wanderer's Palace - The Long Hall - The Final Ease (12,6)
Rewards: Allagan Tomestone of Philosophy x 30
The 2nd encounter in the Palace is with a large Flan named the Giant Bavarois. This can prove to be a difficult fight if people aren't paying attention! The Giant Bavarois loves to cast 'Fire' which can be interupted by a stun or by just moving behind him.
The real fun of the fight starts after Bavarois summons 3 to 4 additional flans to join the party. These adds should be AoE'd down quickly and shouldn't be a problem. The two colors that should have priority are the White Flan, which casts 'Blizzard' that causes 'Heavy' and the Purple Flan, which casts 'Thunder' that causes 'Paralysis'.
In addition to the adds, the Giant Bavarois will move his eyes to 'focus on a single target' and begin to chasing a random target. The Flan will cast 'Fire' on this target and then 'Amorphic Flail' which should be avoided by running away from the Flan. The targeted player can stop running away as soon as the boss returns to the Tank.
Roles:
- Tank - Taunt the Flan and keep faced away from party. Interupt 'Fire' with Stun or move behind boss.
- Healer - Heal party. Remove 'Paralysis' and 'Heavy' from inflicted players.
- DPS - DPS boss, switch to the adds when they spawn and AoE them down - Focus on Purple and White adds. Run away from boss if he focuses on you
Abilities:
Giant Bavarois' Abilities:
- Fire - Cast that deals about 1500 damage
- Amorphic Flail - Focused strike on targeted player for a larege amount of damage
Purple Bavarois' Abilities:
Thunder - Deals light damage and inflicts Paralysis
White Bavarois' Abilities:
Blizzard - Deals light damage and inflicts Heavy.
Green Bavarois' Abilities:
Aero - Deals light damage and inflicts Windburn (DoT)
Blue Bavarois' Abilities:
Water - Deals light damage
Tonberry King
Taxonomy: Bloodborn/Spoken/Tonberry
HP: 55,000
Location: The Wanderer's Palace - The Chantry (12,2)
Rewards: Allagan Tomestone of Philosophy x 50, Allagan Tomestone of Mythology x 30
The final boss is the legendary Tonberry King and his sharpened blade. This fight can be a little challenging, but is easy if everyone cay pay attention to how many stacks of 'Rancor' they have. The Tank should pull the boss to the middle of the room and stay within melee range to avoid 'Scourge of Nym'.
Tonberry King will eventually summon smaller Tonberry adds that should be killed as they spawn; which is where the stack watching begins... When an add dies they will give the Tonberry King a stack of 'Rancor'. When the King uses 'Everybodys Grudge' it will deal damage dependent on how many stacks of 'Rancor' he has, so try to stop attacking him at about 3 stacks. The stacks of 'Rancor' will reset everytime he casts 'Everybodys Grudge'.
At around 25% the Tonberry King will spawn more small Tonberry adds called "Tonberry Slashers". The slashers will slowly move to the center of the room and should be avoided, as they will deal heavy damage to targets close to them. At this point all DPS should just focus on burning down the boss or kill the other adds if they are causing too much damage.
Roles:
- Tank - Taunt boss and keep in the middle of the room
- Healer - Heal party. Remove 'Paralysis' and 'Heavy' from inflicted players. Help burn down adds.
- DPS - DPS boss, switch to the adds when they spawn.
Abilities:
Tonberry Slasher Abilities
- Lateral Slash - Instant melee attack that deals a small amount of damage to a single target
- Whetstone - Instant ability that gives the Tonberry King the "Sharpened Knife" buff. Tonberry King's next 'Lateral Slash' will be 'Sharpened Knife' and will deal more damage.
- Sharpened Knife - Instant melee attack that deals a medium amount of damage to a single target.
- Scourge of Nym - Instant ranged attack that deals a heavy amount of damage and inflicts the debuff heavy 'Heavy'.
- Everybody's Grudge - Ability that will consume all the stacks of 'Rancor' on Tonberry King and deals a moderate amount of damage for every stack of Rancor.
Throat Stab - Instant melee attack that deals heavy damage to target
-
 Have a guide, tips, boss strategy? Have some cool FFXIV fanart you want to showcase? Submit your resource and we'll get it posted. Depending on the complexity, length and validity of the resource, you will also earn Gil. Gil can be used to cash out for real money or later purchase items from the store! Learn more.
The Wanderer's Palace Guide and Strategy
General tips and strategy for The Wanderer's Palace dungeon in FFXIV
![[IMG]](http://ffxivaddicts.com/images/dungeons/the-wanderers-palace-tonberry-king-2t.png)


